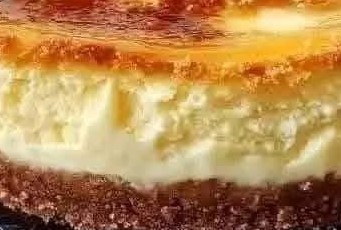
Creme Brulee Cheesecake Recipe
Creme Brulee Cheesecake: A Luxurious Dessert for Every Occasion
ADVERTISEMENT
Indulge in the ultimate dessert experience with this Crème Brûlée Cheesecake, a decadent fusion of two beloved classics. This recipe combines the creamy richness of cheesecake with the sweet, crisp caramelized topping of crème brûlée. Whether you’re hosting a dinner party or treating yourself to a special dessert, this luxurious cake will impress every guest. Follow this step-by-step guide to create a masterpiece that looks and tastes as if it came straight from a professional bakery.
Preparation Time
- Prep Time: 30 minutes
- Cooking Time: 1 hour 15 minutes
- Chill Time: 4+ hours
- Total Time: 6 hours minimum
- Servings: 12 slices
Ingredients
For the Crust:
- 1 ½ cups graham cracker crumbs (or vanilla wafer crumbs)
- ¼ cup granulated sugar
- ½ cup melted butter
For the Cheesecake Filling:
- 3 (8 oz) packages cream cheese, softened
- 1 cup granulated sugar
- 1 tsp vanilla extract
- ¼ tsp salt
- 3 large eggs
- 1 cup sour cream
- ¼ cup heavy cream
For the Crème Brûlée Topping:
- ¼ cup granulated sugar (for caramelizing)
- 1 tbsp dark brown sugar (optional, for extra richness)
Instructions
1. Prepare the Crust
- Preheat your oven to 325°F (160°C).
- In a medium bowl, combine graham cracker crumbs, sugar, and melted butter. Mix until the texture resembles wet sand.
- Press the mixture evenly into the bottom of a 9-inch springform pan. Use the back of a spoon to compact the crust firmly.
- Bake the crust for 8-10 minutes, then set aside to cool.
2. Make the Cheesecake Filling
- In a large mixing bowl, beat the cream cheese and sugar with an electric mixer until smooth and creamy.
- Add the vanilla extract and salt, mixing to combine.
- Incorporate the eggs one at a time, beating well after each addition.
- Mix in the sour cream and heavy cream until fully combined. Avoid overmixing to prevent cracks.
- Pour the filling over the prepared crust, smoothing the top with a spatula.
3. Bake the Cheesecake
- Wrap the outside of the springform pan tightly with aluminum foil to prevent water from seeping in.
- Place the pan in a large roasting dish and pour hot water into the dish, filling it halfway up the sides of the pan to create a water bath.
- Bake the cheesecake for 60-75 minutes, or until the edges are set, and the center jiggles slightly when shaken.
- Turn off the oven, crack the door open, and let the cheesecake cool in the oven for 1 hour to prevent cracking.
4. Chill the Cheesecake
- Remove the cheesecake from the water bath and cool to room temperature.
- Refrigerate the cheesecake for at least 4 hours, or overnight, for the best texture and flavor.
5. Prepare the Crème Brûlée Topping
- Once the cheesecake is fully chilled, sprinkle an even layer of granulated sugar across the surface.
- Optional: Mix in a small amount of dark brown sugar for added depth and richness.
- Using a kitchen torch, caramelize the sugar by moving the flame in small, circular motions until it melts and turns golden brown. Allow the topping to harden before serving.
Serving and Presentation
Slice the Crème Brûlée Cheesecake into 12 even portions using a sharp, warm knife for clean cuts. Serve on elegant dessert plates, garnished with fresh berries or a drizzle of raspberry sauce for a vibrant touch. This dessert is best enjoyed chilled and freshly caramelized for the ultimate contrast between the creamy filling and the crunchy topping.
This Crème Brûlée Cheesecake is a show-stopping dessert that brings together the best of both worlds. Its velvety texture, balanced sweetness, and impressive presentation make it the perfect treat for any celebration. By following this recipe, you’ll create a dessert that’s not only visually stunning but also irresistibly delicious. Try it for your next gathering and watch it become the centerpiece of your table!
ADVERTISEMENT